Let’s play… Ansible book!

< Previous : https://knowledgehunter.code.blog/2020/10/10/getting-ready-n-ansible-ping/


Introduction to Playbook

Ansible playbook is the place where we can setup multiple tasks to get executed through Ansible.

This is mainly happens through playbook.yml file.

Note : The syntax and format follow in this YAML file and other relevant YAML file is VERY IMPORTANT. They must exactly follow the formats otherwise the application will misbehave

[ref : https://docs.ansible.com/ansible/latest/reference_appendices/YAMLSyntax.html]

You need to create this playbook.yml in the place that you run the ansible commands
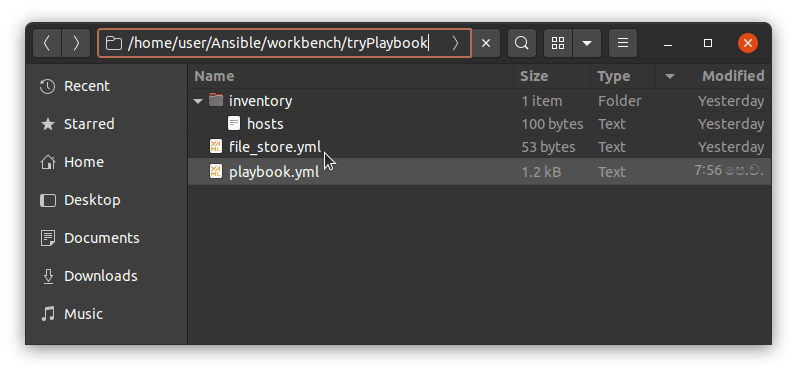
(Donโ€™t worry about the file_store.yml file at this moment it is for one tasks to provide the directory names to create the directories in remote ansible hosts)

This is how the tasks defines in the playbook.yml.

Note : Please note the name โ€˜playbookโ€™ is optional you can use anyother name also for that.

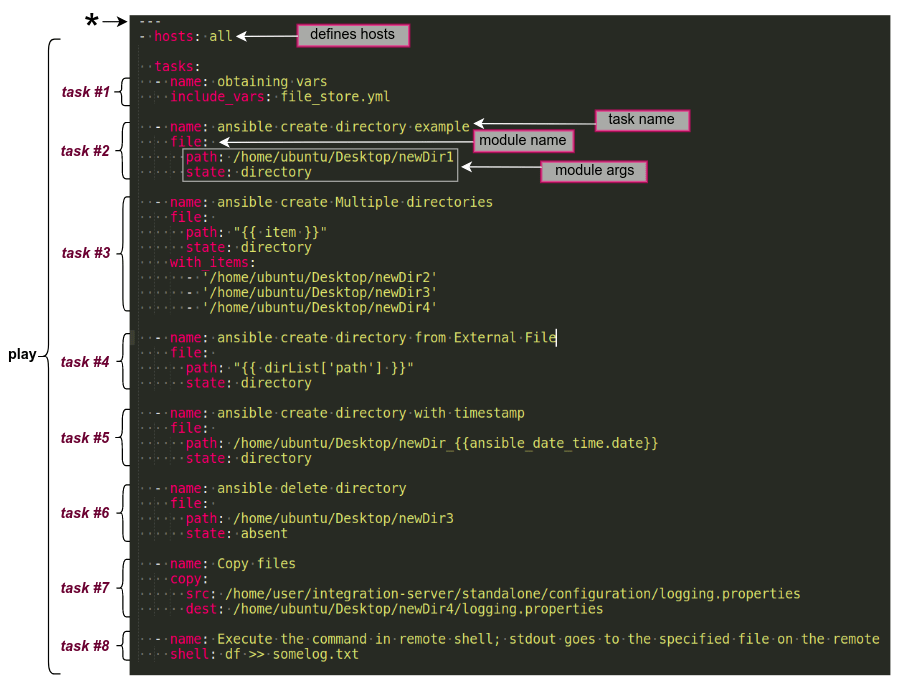
In this case, the playbook file part contains the tasks, hosts etc is called as a โ€œplayโ€. You can define multiple plays in a play book and you can give them a name also. And the connecting user also you can define in there.

eg:

- name: play1
  hosts: webServers
  remote_user: ubuntu
  tasks:
    - name: install httpd # going to install apache
      yum:
        name: httpd
        state: latest
- name: play2
  hosts: dbServers
  remote_user: centos
  tasks:
    - name: install httpd # going to install apache
      yum:
        name: httpd
        state: latest

The hosts parameter refers the Ansible hosts that the play is going to execute on. eg : you can mention the particular server group also in this case. Or you can mention them as all where it will effect to all of the servers in the host file.

eg :

[servers]
server1 ansible_host=192.168.1.15

[all:vars]
ansible_python_interpreter=/usr/bin/python3

Zooooming on tasks..

Letโ€™s closer look at the each task

task#1 : Obtaining vars

  - name: obtaining vars
    include_vars: file_store.yml

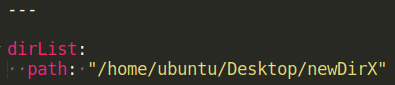
This is a builtin angular module to load the variables that was stored in external file file_store.yml.

In this case variables are stored as above in that file and they can be loaded as โ€œ{{ dirList[โ€˜pathโ€™] }}โ€. This is used in task#4.

[ref : https://docs.ansible.com/ansible/latest/collections/ansible/builtin/include_vars_module.html]

task #2 : Ansible create directory

  - name: ansible create directory example
    file: 
      path: /home/ubuntu/Desktop/newDir1
      state: directory

Ansible builtin file module is used for this and state directory is to create a directory in the path mentioned (newDir1 is the new direcotory name). If you are using the relative paths, path will be created related to the user directory.

(eg : if the path is path: newParent/newDir1, directory will be created under /home/ubuntu/newParent/newDir1)

[ref : https://docs.ansible.com/ansible/latest/collections/ansible/builtin/file_module.html]

task #3 : Create multiple directories

  - name: ansible create Multiple directories
    file: 
      path: "{{ item }}"
      state: directory
    with_items:
      - '/home/ubuntu/Desktop/newDir2'
      - '/home/ubuntu/Desktop/newDir3'
      - '/home/ubuntu/Desktop/newDir4'

In this case file path is given using the list of items mentioned in with_items

[ref : https://docs.ansible.com/ansible/latest/user_guide/playbooks_loops.html]

task#4 : Create directory taking the file name from external source

  - name: ansible create directory from External File
    file: 
      path: "{{ dirList['path'] }}"
      state: directory

In this case, we load the path from the external file as discussed in task#1

task#5 : Create directory with timestamp adding to the name

  - name: ansible create directory with timestamp
    file: 
      path: /home/ubuntu/Desktop/newDir_{{ansible_date_time.date}}
      state: directory

In this case we have used an ansible playbook variable ansible_date_time to get the date appended to the directory name.

[ref:https://docs.ansible.com/ansible/2.5/user_guide/playbooks_variables.html]

task#6 : Delete directory

  - name: ansible delete directory
    file: 
      path: /home/ubuntu/Desktop/newDir3
      state: absent

In this case we delete a created directory using the state as absent

task#7 : Copy files

  - name: Copy files
    copy:
      src: /home/user/Fun/integration-server/standalone/configuration/logging.properties
      dest: /home/ubuntu/Desktop/newDir4/logging.properties

In this case, we copy logging.properties file from Ansible Control Node โ€“ Local PC to newDir4 in the remote Ansible Host. For this we have used ansible builtin copy module.

[refer : https://docs.ansible.com/ansible/latest/collections/ansible/builtin/copy_module.html]

task#8 : Execute shell command

  - name: Execute the command in remote shell; stdout goes to the specified file on the remote
    shell: df >> somelog.txt

In this case we execute a shell command. eg : get the disck usage and writ to a file. We have used Ansible builtin shell module for this.

[ref : https://docs.ansible.com/ansible/latest/collections/ansible/builtin/shell_module.html]


Run the playbook.

Now you can simply run the playbook using below command

$ ansible-playbook -u ubuntu -i inventory/ playbook.yml

Response :

PLAY [all] *

TASK [Gathering Facts] *
ok: [server1]

TASK [obtaining vars] **
ok: [server1]

TASK [ansible create directory example]
changed: [server1]

TASK [ansible create Multiple directories] ***
changed: [server1] => (item=/home/ubuntu/Desktop/newDir2)
changed: [server1] => (item=/home/ubuntu/Desktop/newDir3)
changed: [server1] => (item=/home/ubuntu/Desktop/newDir4)

TASK [ansible create directory from External File] *
changed: [server1]

TASK [ansible create directory with timestamp] *
changed: [server1]

TASK [ansible delete directory]
changed: [server1]

TASK [Copy files]
changed: [server1]

TASK [Execute the command in remote shell; stdout goes to the specified file on the remote] **
changed: [server1]

PLAY RECAP *
server1 : ok=9 changed=7 unreachable=0 failed=0 skipped=0 rescued=0 ignored=0

Note :

You can use prefix ANSIBLE_DEBUG=1 to get debug information.

eg : $ ANSIBLE_DEBUG=1 ansible-playbook -u ubuntu -i inventory/ playbook.yml

Further readings :

  • https://docs.ansible.com/ansible/latest/collections/ansible/builtin
  • https://www.digitalocean.com/community/tutorial_series/how-to-manage-remote-servers-with-ansible
  • https://www.tutorialspoint.com/ansible/ansible_playbooks.htm
  • https://techrideradmin.blogspot.com/2018/09/create-directory-in-ansible.html
  • https://www.mydailytutorials.com/ansible-create-directory/
  • https://www.youtube.com/watch?v=EcnqJbxBcM0&t=141s

#ansible, #config-management

Getting ready N’ Ansible ping…

<< Previous : https://knowledgehunter.code.blog/2020/10/10/setup-ansible-in-local/


In the previous aritcle we setup our VM and installed Ansible.

First ssh to the VM to see the user, password and ip is ok. You must be able to log with password.

eg : ssh ubuntu@192.168.1.20

Note : you can get the IP by running the ifconfig on the VMโ€™s terminal.


Get readyโ€ฆ

Letโ€™s try to run some basic Ansible commands.

First of all, to run Ansible, you need to have

  1. One Ansible Control Node : machine weโ€™ll use to connect to and control the Ansible hosts over SSH
  2. One or more Ansible Hosts : any machine that your Ansible control node is configured to automate

In this case, our local PC is the Ansible Control Node and VM is the Ansible Host.

There are some prerequisites fulfilled before start playing with Ansibleโ€ฆ

  1. Ansible Control Node must have a non-root user with sudo privileges.
  2. Ansible Control Node must have SSH keypair associated with this user.

Note : In this case, you must have been already setup the SSH Keys on the local PC. Otherwise refer : https://www.digitalocean.com/community/tutorials/how-to-set-up-ssh-keys-on-ubuntu-20-04,

Or you can generate SSH Keys using IDEโ€™s also like eclipse

[Windows > Preferences > General > Network Connection > SSH2 > Key Management> Generate RSA Key]

3. The Ansible control nodeโ€™s SSH public key must have been added to Ansible Hostโ€™s authorized_keysย for a system user.

You can easily do this by using ssh-copy-id in ssh-copy-id username@remote_host format

eg : $ssh-copy-id ubuntu@192.168.1.20

Note :

Sometimes you may get below like error

sign_and_send_pubkey: signing failed for RSA โ€œ/home/user/.ssh/id_rsaโ€ from agent: agent refused operation

In this case, you must add the ssh keys to Agent using $ ssh-add.

Here. if you get below like warning, you must change the access of the .ssh/id_rsa by running chmod 600 ~/.ssh/id_rsa since the private key has been exposed. Otherwise again ssh-copy-id will fail.

Warining : Permissions 0664 for โ€˜/home/namal/.ssh/id_rsaโ€™ are too open.
It is required that your private key files are NOT accessible by others.
This private key will be ignored.

Once above done, run ssh-copy-id ubuntu@192.168.1.20 again and you should see a success message.

Then try to run ssh ubuntu@192.168.1.20 again this time you must be able to connect without giving the password. This is password less login

Now environment is ready to do Ansible ping..


Do Ansible ping..

Ansible ping means running a connectivity test using Ansibleโ€™s built-in ping module. The ping module will test:

  • if hosts are accessible;
  • if you have valid SSH credentials;
  • if hosts are able to run Ansible modules using Python.

Hosts fileโ€ฆ

You must define the host detail (IPs) in the file called .

The default location for hosts file is /etc/ansible/hosts. But you can define the hosts file in any location you want.

You must define the hosts IPs in the hosts file as mentioned below

[servers]
server1 ansible_host=203.0.113.111
server2 ansible_host=203.0.113.112
server3 ansible_host=203.0.113.113

These server1,ย server2, andย server3 are custom aliases.

Note :

You can define all:vars subgroup also there as mentioned below.

[all:vars]
ansible_python_interpreter=/usr/bin/python3

This parameter makes sure the remote server uses the /usr/bin/python3 Python 3 executable instead of /usr/bin/python (Python 2.7), which is not present on recent Ubuntu versions.

Once the hosts file is defined you can run below command to list the inventories

ansible-inventory โ€“list -y

Note :

If you run any ansible command having specific hosts file (not the generic on in /etc/ansible/hosts), you must give the path (absolute or relative path) using -i flag as follows

if the host file is in the same location that ansible command is executing : -i .

otherwise : -i

eg :

1. ansible-inventory โ€“list -y -i .

2. ansible-inventory โ€“list -y -i inventory

3. ansible-inventory โ€“list -y -i /home/user/ansibleProjects/inventory

If everything is ok youโ€™ll see success response as mentioned below

all:
  children:
    servers:
      hosts:
        server1:
          ansible_host: 103.0.113.111
        server2:
          ansible_host: 103.0.113.112
        server3:
          ansible_host: 103.0.113.113
    ungrouped: {}

Executeโ€ฆ

Then we can run the ansible ping command

ansible all -m ping -u

eg : ansible all -m ping -u ubuntu

For the success responses youโ€™ll get pong for ping as mentioned below.

Outputserver1 | SUCCESS => {
    "changed": false, 
    "ping": "pong"
}
server2 | SUCCESS => {
    "changed": false, 
    "ping": "pong"
}
server3 | SUCCESS => {
    "changed": false, 
    "ping": "pong"
}

Note : this all will execute the ansible module in all the hosts. If you want to execute it only on certain hosts you can mention those specifically. eg :ansible server1 -m ping -u ubuntu

reference : https://www.digitalocean.com/community/tutorials/how-to-install-and-configure-ansible-on-ubuntu-20-04


https://knowledgehunter.code.blog/2020/10/11/lets-play-ansible-book/ Next >>

#ansible, #config-management

Setup Ansible in local

Setup a VM :

To play-around with Ansible we need to have another Machine. Since, I donโ€™t have another PC I downloaded a Virtual Machine to setup.

I downloaded the Ubuntu 20.04 LTS for this.

Find available Linux VMs @ here : https://www.linuxvmimages.com/

I selected the VM Ware Player to run this. Main reasons are it is free, it is light weight. Comparatively itโ€™s UI is not that much sophisticated. But for my use case it is best suit since Iโ€™m mostly accessing it through Terminal.

Note : When you are installing VM Ware Player, you need to install VIX as well

Install VMware Workstation Player

VMware Workstation Player is the free version for VMWare.

It can be downloaded using below link

https://my.vmware.com/en/web/vmware/downloads/info/slug/desktop_end_user_computing/vmware_workstation_player/14_0

Then you will get VMware-Player-14.1.7-12989993.x86_64.bundle

Then run sudo ./VMware-Player-14.1.7-12989993.x86_64.bundle to install it.

You can run it as VMPlayer.

Note : Select โ€œNon-commercial use onlyโ€ option

Install VMware-VIX

VMware-VIX is needed to link the GNS3 with the GNS3 VM.
It can be downloaded using below link

https://my.vmware.com/web/vmware/downloads/details?downloadGroup=PLAYER-1400-VIX1170&productId=687

Then run sudo ./VMware-VIX-1.17.0-6661328.x86_64.bundle to install it.

Note :

VMware-VIX version and VMware Workstation Player must be alligned.

eg : VMware-VIX-1.17 is working with VMware-Player-14. You can see that in the VMware-VIX download link also. Otherwise youโ€™ll get some errors when GNS3 trying to connect to the GNS3VM

Anyway check this to decide any other option you are looking for.

reference :

Open the downloaded VM in VMWare Player. And Power it On!

Note : Password is โ€œubuntuโ€


Installing Ansible

Installing Ansible is strraight forward.

sudo apt update

sudo apt install ansible

Once it is installed you can try out $ ansible โ€“version to check the installation.

Reference : https://docs.ansible.com/ansible/latest/installation_guide/intro_installation.html


https://knowledgehunter.code.blog/2020/10/10/getting-ready-n-ansible-ping/ Next >>

#ansible, #devops

Working with multi-module Maven project

Maven Module :
Maven module is a Maven Sub Project. So, to have a Maven module, first you need to have a Maven Parent Project.
In this parent project, you need to enable the packaging as โ€œpomโ€œ.

Once you create the parent project create Modules as follows,
[Right click on the parent project created] > New > Other > [Maven]
Maven Module


Archetype :
You can create the project as a simple one, by passing the archetype. Otherwise, select the relevant arche-type.
eg : maven-archetype-quickstart

Archetype is a Maven project templating toolkit. An archetype is defined as an original pattern or model from which all other things of the same kind are made.
We use this to generate different types of projects such as war, jar, ear etc easily.


Aggregator POM / Parent POM :

A multi-module project is built from an aggregator POM that manages a group of submodules.
Here, a top-level module serving for joining multiple modules under one roof is called aggregator and aggegator does not include any information about dependencies. Aggregator has a small difference with parent pom. The source of to-be-inherited information about libraries and plugins is known as a parent POM. So, unlike aggregator, parent pom, includes all the properties, dependencyManagement and pluginManagement sections.

Normally, all configuration with dependencies are included to the parent pom and set it as the parent of the child modules, so theyโ€™ll inherit from it.

Submodules are regular Maven projects, and they can be built separately or through the aggregator POM.
It aggregates the projects as below

Parent / Aggregator POM :

<project xmlns="http://maven.apache.org/POM/4.0.0"
	xmlns:xsi="http://www.w3.org/2001/XMLSchema-instance"
	xsi:schemaLocation="http://maven.apache.org/POM/4.0.0 https://maven.apache.org/xsd/maven-4.0.0.xsd">
	<modelVersion>4.0.0</modelVersion>
	<groupId>blog.code.knowledgehunting.corejava</groupId>
	<artifactId>ParentApp</artifactId>
	<version>0.0.1-SNAPSHOT</version>
	<packaging>pom</packaging>

	<modules>
		<module>ChildApp1</module>
		<module>ChildApp2</module>
		<module>ChildApp3</module>
	</modules>

</project>

ChildApp1 โ€“ pom.xml

<project xmlns="http://maven.apache.org/POM/4.0.0" xmlns:xsi="http://www.w3.org/2001/XMLSchema-instance" xsi:schemaLocation="http://maven.apache.org/POM/4.0.0 https://maven.apache.org/xsd/maven-4.0.0.xsd">
  <modelVersion>4.0.0</modelVersion>
  <parent>
    <groupId>blog.code.knowledgehunting.corejava</groupId>
    <artifactId>ParentApp</artifactId>
    <version>0.0.1-SNAPSHOT</version>
  </parent>
  <artifactId>ChildApp1</artifactId>
</project>

Benifits of multi module projects :

  • Reduce duplication.
  • Build multiple modules inlined to mavenโ€™s build life cycle. here, applicationโ€™s modules can be built in a single command.
  • Share a vast amount of configuration with other modules.

Mavenโ€™s build life cycle :

Mavenโ€™s build life cucle contains following like default pifecycle phases

  • validate โ€“ validate the project is correct and all necessary information is available
  • compile โ€“ compile the source code of the project
  • test โ€“ test the compiled source code using a suitable unit testing framework. These tests should not require the code be packaged or deployed
  • package โ€“ take the compiled code and package it in its distributable format, such as a JAR.
  • verify โ€“ run any checks on results of integration tests to ensure quality criteria are met
  • install โ€“ install the package into the local repository, for use as a dependency in other projects locally
  • deploy โ€“ done in the build environment, copies the final package to the remote repository for sharing with other developers and projects.

Code : https://bitbucket.org/namalfernando/parentapp/src/master/


References :

  1. https://docs.jboss.org/tools/4.1.0.Final/en/maven_reference/html/creating_a_maven_application.html
  2. https://maven.apache.org/guides/introduction/introduction-to-archetypes.html
  3. http://rostislav-matl.blogspot.com/2011/12/maven-aggregator-vs-parent.html
  4. https://maven.apache.org/guides/introduction/introduction-to-the-lifecycle.html
  5. https://www.youtube.com/watch?v=28fsqKNjxrc

#eclipse, #maven

Enabling DEBUG only for some packages and restrict all others in log4j

In this case, first need to understand the how log level (org.apache.log4j.Level) works. There are eight log leveles defines in the framework and you can also define your custom levels by sub-classing the Level class.

Here, the โ€œRestrictive Levelโ€ of a Logger level is determined by considering itโ€™s โ€œintLevelโ€ value. Higher the intLevel, lower the Restrictive Level.

Restrictive LevelintLevelLevelDescription
0Integer.MAX_VALUE
ALLAll levels including custom levels.
1600TRACEFiner-grained informational events than the DEBUG
2500DEBUGUseful to debug an application
3400INFOHighlight the progress of the application at coarse-grained level
4300WARNHighlight potentially harmful situations.
5200ERRORHighlight the error events that might still allow the application to continue running.
6100FATALHighlight very severe error events that will presumably lead the application to abort.
70OFFHighest possible rank / restrctive level and is intended to turn off logging.

In logger configuration, root-logger is for system wide. Package level configuration can be defined under logger@category/level@name.

So, to get this done, we give more restrictive level to root-logger and give less restrictive levels to specified packages through logger@category/level@name.

eg :
com.some.package โ€“ > DEBUG
In this package all the log levels below and including DEBUG will be logged. (eg : DEBUG, INFO, WARN, ERROR etc)

com.some.another.package โ€“ > INFO
In this package all the log levels below and including INFO will be logged. (eg : INFO, WARN, ERROR etc). But DEBUGs within this packages will not be logged

com.some.unwanted.package โ€“ > ERROR
In this package all the log levels below and including ERROR will be logged. This is mostly like ERROR only (eg : ERROR, FATAL, OFF, TRACE etc)

root -> INFO
Since root level is INFO, all the log levels below and including INFO will be logged (eg : INFO, WARN, ERROR etc) but DEBUGs will not be logged unless they have not been specified above

eg :

<subsystem xmlns="urn:jboss:domain:logging:6.0">
    <console-handler name="CONSOLE">
        <formatter>
            <named-formatter name="COLOR-PATTERN"/>
        </formatter>
    </console-handler>
    <periodic-rotating-file-handler name="FILE" autoflush="true">
        <formatter>
            <named-formatter name="PATTERN"/>
        </formatter>
        <file relative-to="jboss.server.log.dir" path="server.log"/>
        <suffix value=".yyyy-MM-dd"/>
        <append value="true"/>
    </periodic-rotating-file-handler>
    <logger category="com.some.package ">
        <level name="INFO"/>
    </logger>
    <logger category="com.some.another.package">
        <level name="INFO"/>
    </logger>
    <logger category="com.some.unwanted.package ">
        <level name="ERROR"/>
    </logger>
    <root-logger>
        <level name="INFO"/>
        <handlers>
            <handler name="CONSOLE"/>
            <handler name="FILE"/>
        </handlers>
    </root-logger>
    <formatter name="PATTERN">
        <pattern-formatter pattern="%d{yyyy-MM-dd HH:mm:ss,SSS} %-5p [%c] %s%e%n"/>
    </formatter>
    <formatter name="COLOR-PATTERN">
        <pattern-formatter pattern="%K{level}%d{HH:mm:ss,SSS} %-5p [%c] %s%e%n"/>
    </formatter>
</subsystem>

References :

  • https://logging.apache.org/log4j/2.x/manual/customloglevels.html
  • https://www.tutorialspoint.com/log4j/log4j_logging_levels.htm

#log4j, #logging, #wildfly

Important tail commands

Outputs the last 10 lines of the file myfile.txt. Default is 10 lines.

tail /path/to/file/myfile.log

Outputs the last 100 lines of the file myfile.txt.

tail -n 100 /path/to/file/myfile.log 

Outputs the last 10 lines of myfile.txt, and keep follow on myfile.txt for updates; Here, -f option โ€œwhich stands for followโ€ will keep the stream goingโ€ฆ

tail -f /path/to/file/myfile.log

Selectively keep follow a log file in real time.

tail -f /path/to/file/myfile.log | grep 24.10.160.10

Outputs the last 10 lines of myfile.txt, and keep follow on myfile.txt for updates with a sleep interval. Here, -s option is for โ€œsleepโ€ and specify the sleep interval

tail -f -s 5 /path/to/file/myfile.log

We can use this to in conjunction with different other commands

ps aux | sort -nk +3 | tail -5

References :

  • https://www.howtogeek.com/481766/how-to-use-the-tail-command-on-linux/

#bash, #tail

Important vi commands

Starting vi

  • vi filename : edit filename starting at line 1
  • vi -r filename : recover filename that was being edited when system crashed

Navigating

  • ^f : move forward one screen
  • ^b : move backward one screen
  • ^d : move down (forward) one half screen
  • ^u : move up (back) one half screen

Searching Text

  • /string : search forward for occurrence of string in text
  • ?string : search backward for occurrence of string in text
  • n : move to next occurrence of search string
  • N : move to next occurrence of search string in opposite direction

Adding / Changing / Deleting text

  • i : insert text before cursor, until hit
  • I : insert text at beginning of current line, until hit
  • a : append text after cursor, until hit
  • A : append text to end of current line, until hit
  • o : open and put text in a new line below current line, until hit
  • O : open and put text in a new line above current line, until hit

Cutting and Pasting Text

  • yy : copy (yank, cut) the current line into the buffer
  • Nyy or yNy : copy (yank, cut) the next N lines, including the current line, into the buffer
  • p : put (paste) the line(s) in the buffer into the text after the current line

Exit vi

  • : x ENTER : quit vi, writing out modified file to file named in original invocation
  • :wq ENTER : quit vi, writing out modified file to file named in original invocation
  • :q ENTER : quit (or exit) vi
  • :q! ENTER : quit vi even though latest changes have not been saved for this vi call

References :

  • https://www.cs.colostate.edu/helpdocs/vi.html

#bash, #vi

Finding files in side a jar

List all files in jar-file-name.jar whose name is start with โ€œSomeFileNameโ€

jar -tvf jar-file-name.jar | grep "SomeFileName"

List all files in a jar order by size

jar -tvf jar-file-name.jar | sort -n -r

List all the classes contains the class name with package structure.

find filePath -name '*.jar' | xargs -I @ jar -tvf @ | grep ClassName
find filePath -name '*.jar' | xargs -I @ jar -tvf @ | grep /ClassName

Search and print the jar names and if the class exists then print the class name.

find filePath -name '*.jar' | while read F; do (echo $F; jar -tvf $F | grep ClassName.class) done

Search and print the jar name if the class exsists then prints the class name. (exact match only)

find filePath -name '*.jar' | while read F; do (echo $F; jar -tvf $F | grep /ClassName.class) done

#bash, #find, #jar, #search

Speedup coding with eclipse editor templates

In eclipse IDE go toโ€ฆ

  1. Windows > Preferences
  2. Java > Editor > Templates
  3. Create a new template OR select the Existing one to edit
  4. Add this pattern in there
logger.info("${enclosing_method}().${word_selection} : " + ${word_selection}${});${cursor}

References :

  • http://poojapainter11.wordpress.com/2013/08/10/eclipse-shortcuts/
  • http://www.grobmeier.de/log4j-2-performance-close-to-insane-20072013.html
  • http://eannaburke.wordpress.com/2013/06/28/a-rudimentary-logger/

#eclipse, #ide, #utility

Find/Replace in eclipse using regex

We can find a regex pattern and do a replace as mentioned below. This is very helpful when we are doing bulk replacing.
eg : Comment all the lines containing a word (selectedWord)

Steps :

  1. Ctrl + F
  2. Find ^.selectedWord.$
  3. Replace //$0
  4. Options : Check Regular Expressions

#eclipse, #ide, #utility